SNMP Auto-Discovery using the "Discover" Module in T/Mon
Let's walk through how to set up an SNMP discover module. This module is designed for when you want to get a preliminary idea of what types of alarms and messages your equipment can send to your T/Mon.
What to check before you start
Before we get started, make sure that your device is on the network and can send SNMP traps to the T/Mon. So, if you have a firewall, or anything that could similarly block traffic, work with your IT security team to guarantee that this is not preventing SNMP traps from being sent. The T/Mon will be listening on port 162, so you'll want to ensure that it's receiving the UDP traffic from there.
How to set up the "SNMP Discover" module in T/Mon

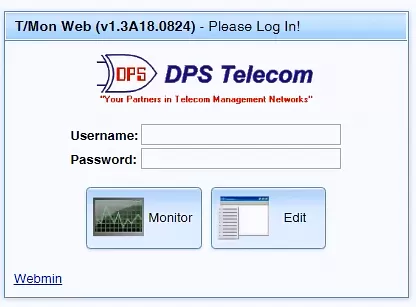
On the web interface, type in your username and password and click on "Edit".
- To start, the first thing you'll do is log into your T/Mon web interface. Make sure to have the SNMP software module installed on your T/Mon system for this to work - otherwise you won't have access to the SNMP Discover module.
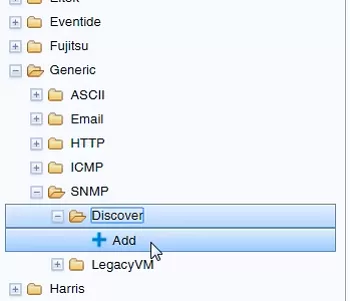
You can see that we have some other protocols under "Generic", but the one that we're focusing on is SNMP. - After logging in, find "Devices" under the menu "T/Mon LNX" - it'll be on the left-hand side of your screen. This will load another page with a list of devices. Select "Generic" and, in the list of protocols under that, click on "SNMP". Then select "+Add" under "Discover".
- On the new pop-up box called "Add Device", you'll put in the name of the device you're configuring. This is going to be the initial name of the device while you're capturing data (it can be changed later).
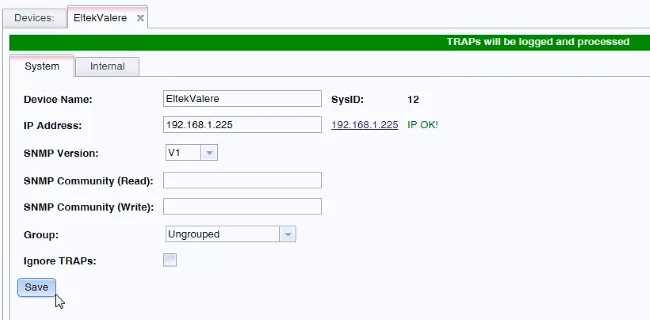
- After naming your device, you'll see that its name is now underneath "+Add" under the "Discover" menu. Right-click on your device's name and go to "Edit". This will take you to a new tab where you'll add the device's IP address.
- The T/Mon does log all the SNMP traps that get sent to it, but this is going to help you more, because you're setting up the Discover module to capture a specific device. This is useful if you have other equipment that's already sending traps to your T/Mon. When you're focusing on building a brand-new module, it makes sense to use the discovered device because it has its own IP address.
Make sure that the top of your tab is green before saving your changes. This means that your T/Mon is processing traps.
You can also select the SNMP version now if you want, but that's not necessary because it's only used when you're doing SNMP gets against the equipment. For processing traps, we process the V1 and V2c by default, so it's not going to prevent any traps from showing up in the logs. It's the same thing for the SNMP Community String. We'll leave them blank for now, but you'll most likely put them as public when you're first setting them up. - It's important to uncheck the "Ignore TRAPs" button. If you have this box checked, the T/Mon will not process any traps. You can confirm this step by checking if your screen has a green line with the saying "TRAPs will be logged and processed". Following that, click on "Save".
- After this step, your T/Mon is basically set up. It should receive incoming traps from your equipment. Now you can play around with it to see what type of events can be sent from the device. Depending on your equipment, you can trigger events like restart it, pull out card slots, unplug user net connectors, change some settings that'll generate faults, etc.
Your MIB file makes a difference
If you're lucky, you'll have a MIB file that's thorough enough to tell you most of this, and you'll be using this device module just to confirm what you see in the MIB.
Unfortunately, many manufacturers don't give you such a good MIB file. In that case, you'll have to do the configuration yourself, by manually testing alarms and similar things.
Call DPS for help
If you need any help with SNMP - whether or not you have a T/Mon - give us a call at 1-800-693-0351. We'll help you get your bearings as you evaluate your SNMP network.
At DPS, we receive many urgent quote requests after an earlier "Do Nothing" decision comes back to bite you. You have no reason not to be proactive (and maybe you'll manage to impress your boss).
Call us. Chat with an expert for 10 minutes. We'll email you a detailed quote with a custom application drawing. We'll even include a summary of business benefits you can use to justify your project budget.
Call 1-800-693-0351 now for your quote
(or send us a quick online message instead)