7485

Get a Live Demo

You need to see DPS gear in action. Get a live demo with our engineers.

Get the Alarm Fundamentals White Paper

Download our free Monitoring Fundamentals Tutorial.

An introduction to Monitoring Fundamentals strictly from the perspective of telecom network alarm management.

DPS is here to help.

1-800-693-0351

Have a specific question? Ask our team of expert engineers and get a specific answer!

Learn the Easy Way

Sign up for the next DPS Factory Training!

DPS Factory Training

Whether you're new to our equipment or you've used it for years, DPS factory training is the best way to get more from your monitoring.
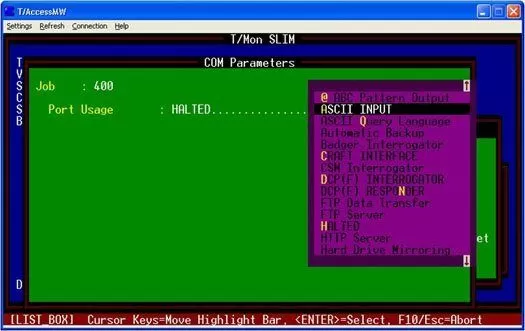
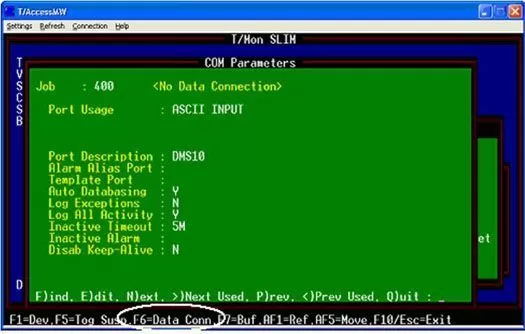
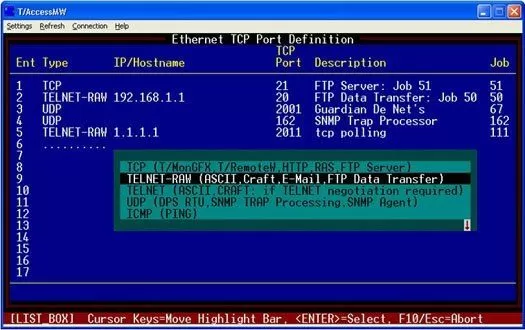
Reserve Your Seat Today

Problem: Trouble Setting Up ASCII for the First Time
Platform: T/MonXM, NOC, SLIM

ASCII Processing is one of the most powerful and flexible features supported by T/Mon. It gives T/Mon the ability to monitor the English output of your telecom network and declare alarms based on your selection criteria from ASCII devices like switches, PBXs, and routers. Unlike other protocols that may be used to report alarm information, ASCII is free-form, non-standard, and may say almost anything.

This "Techno Knowledge Paper" can help you if:


  • You are setting up ASCII on T/Mon for the first time
Quick Reference Chart
reference chart
(for more details, review the troubleshooting checklist below)
Troubleshooting Checklist In this example, we'll be using the T/Mon to Telnet to a DMS10 switch to extract the ASCII alarm information.

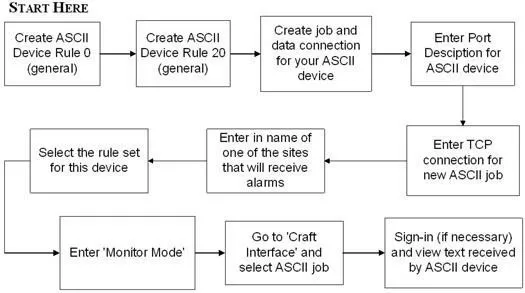
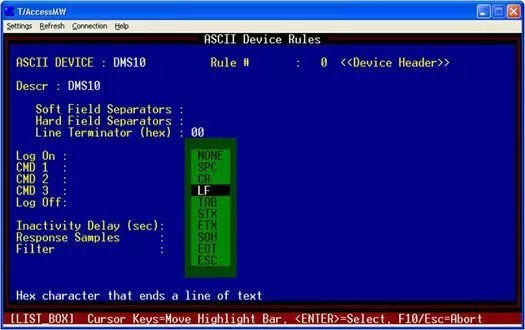
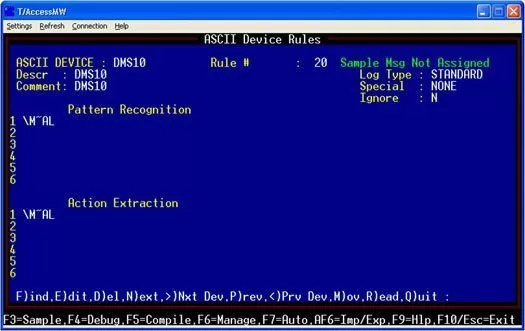
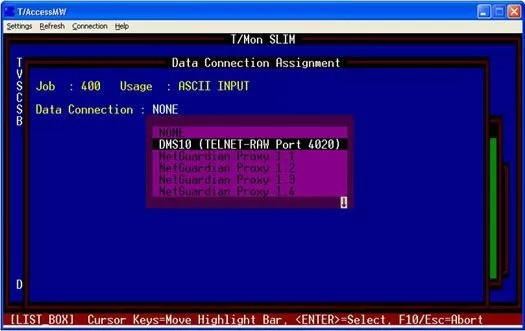
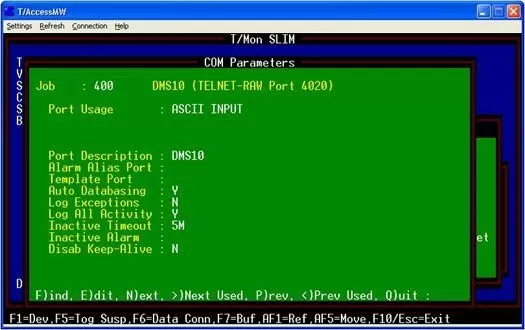
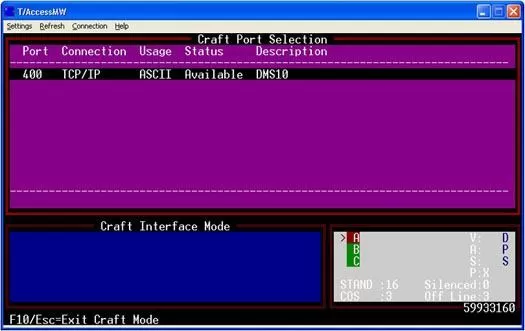
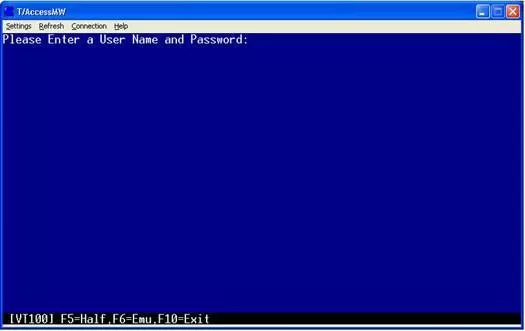
First we need to set up two very general rules for the T/Mon to capture all the data being received by the DMS10. Keep in mind that these settings will be changed after we are done verifying a connection to the ASCII device.

  1. Go to the Master Menu and select 'Files', 'ASCII Devices', then 'Rules'.
    1. Give your rule a name (8 characters max) and hit ENTER. Start on rule 0, then hit ENTER again. Give the rule a description, go down to the Line Terminator Field, then hit TAB. Select LF for Line Feed. Keep hitting ENTER until at the end of the page.
      setting up ascii rule 0
      Fig. 1 - Setting up ASCII Rule 0
    2. Hit 'F' for Find and go to rule 20. Hit (Y)es to create this rule. Press ENTER through the default settings. When you reach Pattern Recognition and Action Extraction, enter "/M~AL". (These steps are just temporary so that when we are ready, we can put T/Mon in Monitor Mode and record all the ASCII text to a log file. We will discuss the many different commands that can be used to parse ASCII text after we verify a data connection.)
      Setup Rule for allowing all information that is seen by the T/Mon to be processed and recorded to a log file
      Fig. 2 - Setup Rule for allowing all information that is seen by the T/Mon to be processed and recorded to a log file.
  2. Next, we need to create the "job" and data connection for the ASCII device. Keep hitting ESC to go back out to the Main Menu. Go to 'Parameters', 'Remote Ports', then hit F for 'Find'. Enter in an available job number between 50 and 499. (All jobs 50 and above are for LAN-based connections)
  3. Hit E for 'Edit' and then TAB to select an ASCII INPUT job. Hit ENTER.
    Create ASCII Input job
    Fig. 3 - Create ASCII Input job
  4. Here, you will enter in a port description. (For a full description of ASCII port connection options please review the user manual section M6-60. This document will cover only the basic steps needed to setup an ASCII job and rule assignments.) You will notice below that we changed Auto Databasing from NO to YES. This will allow the T/Mon to auto database alarm points as they are sent. Another important option we will activate is the Log All Activity. Make sure this is set to YES. This is a good troubleshooting tool that will capture all activity on this port and write it to a log file called al400.rep (ASCII LOG job 400: Keep in mind that it will always display the job as a 3 digit number, so if job 50 is used, it will appear like "al050").
    Typical settings for an ASCII Input Job
    Fig. 4 - Typical settings for an ASCII Input Job
  5. You will notice "No Data Connection" is blinking at the top. Hit F6 for 'Data Connection', then F1 for 'TCP Ports'.
    Hit F1 to go to the TCP Port assignment screen
    Fig. 5 - Hit F1 to go to the TCP Port assignment screen
  6. This step is where you create the TCP connection for the new job. Scroll down to the next available connection. (In this case, Entry #6.)
    1. Hit TAB to select the type of data connection. In this example, we'll be setting up a Telnet-RAW connection (If you find later on that you are receiving garbage characters from the device, you might try a regular Telnet connection). Hit ENTER.
    2. Enter the IP address of your device and hit ENTER.
    3. Enter the TCP port we will be connecting to the device on and hit ENTER.
    4. Enter a description of your device and hit ENTER. (Standard Telnet is port 23, but verify on which port your device listens.)
    5. The job number to the right will initially be 0. Don't worry - this number will change when we assign it to the job. When your cursor is at the beginning of the next line, hit F8 to save.
    TCP Port definition
    Fig. 6 - TCP Port definition
  7. Back on the 'Data Connection Assignment' screen, hit TAB and scroll down to select the newly created data connection. This will automatically take you back to the port setup on T/Mon showing your job, along with its data connection at the top.
    Select the newly created Data Connection
    Fig. 7 - Select the newly created Data Connection

    Port setup of the new data connection
    Fig. 8 - Port setup of the new data connection.
  8. Hit F1 and enter the name of one of the sites you will be receiving alarms.
    1. When you get to the device type, hit TAB and select the name of the rule you wish to use for this device. Then ENTER through the rest of the settings. (This was the "fake" rule setup from step 1.)
    Assign one device 'site' you will be receiving alarms from, you can have up to 999 sites per ASCII device
    Fig. 9 - Assign one device "site" you will be receiving alarms from, you can have up to 999 sites per ASCII device.
  9. Now, ESC out to the Main Menu. Go to 'Initialize' and choose 'Monitor Mode'.
    1. From the 'Alarm Summary Screen', hit CTRL + F7 to go to the 'Craft Interface'. (By hitting F9 from the Alarm Summary Screen, you will see a help menu listing all available options from that particular screen.)
    2. Scroll to the ASCII job and hit ENTER.
    3. This screen will show you all the text being received by your device and can also be used to type different commands to send to the device. If you normally have to sign in to retrieve alarms, you'll do so now. Keep in mind that all text being received is stored in a report file that can be retrieved from the FTP server on your T/Mon or viewed directly on the system. (To view it directly on the system, escape out of Monitor Mode and go to 'Files', 'Utilities', 'Report Maintenance'. Hit TAB to select the file discussed in Step 5.)
    Hit to view the live streaming text being viewed by the T/Mon
    Fig. 10 - Hit ENTER to view the live streaming text being viewed by the T/Mon.

    You can type commands here that you normally typed from your other interface.
    Fig. 11 - You can type commands here that you normally typed from your other interface.

To receive a price quote or ROI analysis...

Call 1-800-693-0351