Check out our White Paper Series!
A complete library of helpful advice and survival guides for every aspect of system monitoring and control.
1-800-693-0351
Have a specific question? Ask our team of expert engineers and get a specific answer!
Sign up for the next DPS Factory Training!
Whether you're new to our equipment or you've used it for years, DPS factory training is the best way to get more from your monitoring.
Reserve Your Seat TodayOne of the most powerful and necessary functions in network monitoring is the sending of notifications. These will alert you when a condition changes, or when a threshold is reached. This in turn allows you to respond to the change quickly and effectively, as the notification will inform you which alarm has gone active. Without this functionality, it becomes difficult to respond to potential threats to your network. This article will cover how to set up our many different notifications so you will be alerted to changing conditions.
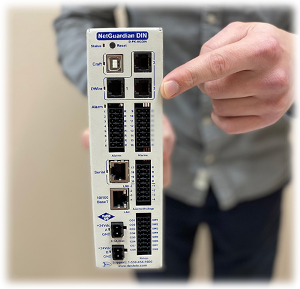
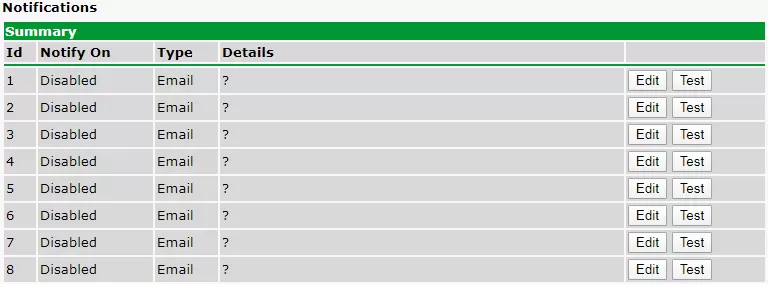
All DPS notifications can be configured from the Provisioning -> Notifications menu. If your unit has a white background, you will want to read our other article here.
Email notification configuration.
Email notifications are the most common notification which can be used for a wide variety of uses. You can send both autenticated and unauthenticated notifications through your email server to your email address. To set it up, first we want to go into Provisioning -> Notifications. From there we choose a notification and click Edit. Then we'll see a window with Status and Type Options. Select the triggers you want for the Notification (Alarms, Clears, or Both) and select "Send Email" for type. Click "Save and Next".
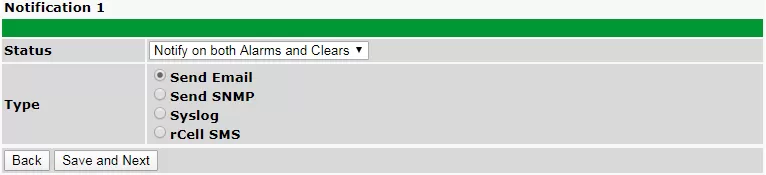
Menu for selecting notification type.
In this window, we need to set up the email server settings that the device will talk through. SMTP Server IP or hostname is the IP of your mail server or, if DNS is configured, the hostname of the server. Port will be whichever port your email server uses. Keep in mind that google has depricated SSL, so some mail communication may not work as expected. Finally, you would configure the "to" and "from" email addresses. If you want authentication, you would fill out the appropriate sections in the lower half of the window. When finished, click "Save and Next."
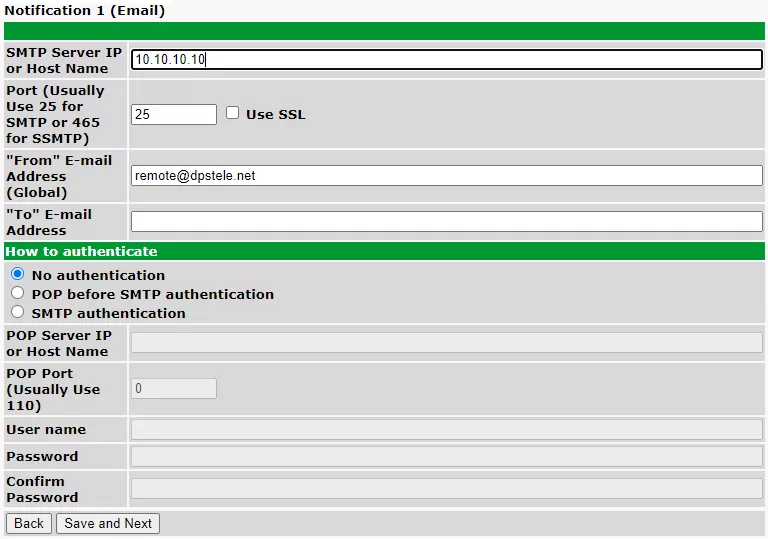
Menu to configure email authentication.
The final step is to set the time range for when the notification will occur. In the example below I've set it to be weekdays from 8 to 5 monday through wednesday, and from 5 to 1 AM on Thursday and Friday. Any alarms attached to this notification that occur outside of these times will not be sent. When you are done, click "Save and Finish."

Schedule when the notification will be active.
Changes may be made to the notification by clicking on "Edit". You may repeat this process for all notifications. When you are done configuring, click Write under Device Access and wait for the confirmation of success. Then click "Reboot" in the same menu. From the notification screen you can test your notifications by clicking on the Test button after the unit has been written to.
When finished configuring notification. Write to the NetGuardian, and then reboot the unit for the settings to initialize.
Another often used Notification type is SNMP. These notifications send traps to the specified trap manager. Setting them up is pretty straightforward. Go into Provisioning -> Notifications. From here choose a notification and click Edit. There we will see a window with Status and Type Options. Select the triggers you want for the Notification (Alarms, Clears, or Both) and select "Send SNMP" for type. Click "Save and Next".
Now we need to tell the device where to send the trap. Input your Trap Manager's IP address, the port you are using, and the trap community string, as well as Trap Type. If you are going to use SNMP v3, you will need to do some configuration under Provisioning -> SNMP. Click "Save and Next". Finally, configure the schedule of when you want this notification to be sent. Click "Save and Finish".
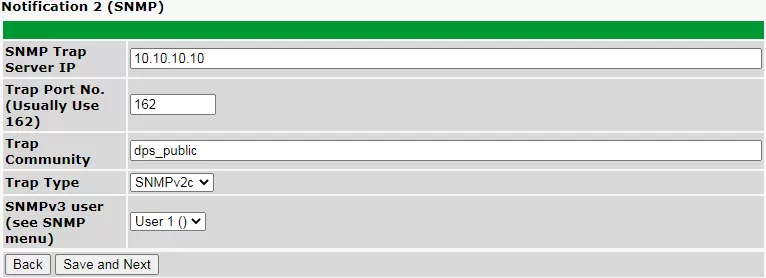
SNMP notification configuration.
Changes may be made to the notification by clicking on "Edit". You may repeat this process for all notifications. When you are done configuring, click Write under Device Access and wait for the confirmation of success. Then click "Reboot" in the same menu. From the notification screen, you can test your notifications by clicking on the Test button after the unit has been written to.
Some devices support Syslog notifications. To set one up, go into Provisioning -> Notifications. From here choose a notification and click Edit. There we will see a window with Status and Type Options. Select the triggers you want for the Notification (Alarms, Clears, or Both) and select "Send Syslog" for type. Click "Save and Next".
Input the IP address or hostname if DNS is setup, and choose your port. Select from the dropdown menus for your priority code and severity. Hit "Save and Next" and configure the schedule of when you want this notification to be sent. Click "Save and Finish".
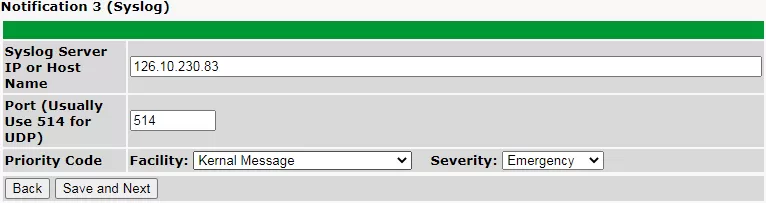
Syslog notification configuration.
Changes may be made to the notification by clicking on "Edit". You may repeat this process for all notifications. When you are done configuring, click Write under Device Access and wait for the confirmation of success. Then click "Reboot" in the same menu. From the notification screen you can test your notifications by clicking on the Test button after the unit has been written to.
The NetGuardian DIN supports communication with Multitech's rCell Modem to send SMS text messages. To set this guy up, go into Provisioning -> Notifications. From here choose a notification and click Edit. There we will see a window with Status and Type Options. Select the triggers you want for the Notification (Alarms, Clears, or Both) and select "rCell SMS" for type. Click "Save and Next". Fill out the fields with the information from your rCell, hit "Save and Next", and configure the schedule of when you want this notification to be sent. Click "Save and Finish".
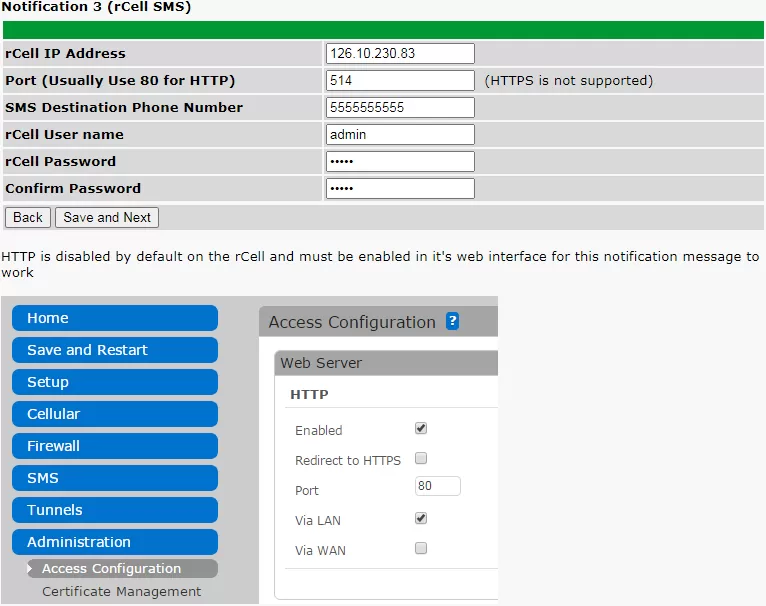
rCell notification configuration.
Changes may be made to the notification by clicking on "Edit". You may repeat this process for all notifications. When you are done configuring, click Write under Device Access and wait for the confirmation of success. Then click "Reboot" in the same menu. From the notification screen you can test your notifications by clicking on the Test button after the unit has been written to.
A few NetGuardians like the Voice and Voice16 G2 support voice notifications. These are phone calls where a generated voice will inform you about an active alarm, and allow you to acknowledge and respond to it. This notification requires a little bit more setup. The first thing you want to do is setup the phone list by going to Provisioning -> Phone List. Here you can set up the list of people to call when you send out voice notifications.

Phone list configuration.
Once you've filled out a number or two, hit save and navigate to Provisioning -> Notifications. Choose a notification and click Edit. There we will see a window with Status and Type Options. Select the triggers you want for the Notification (Alarms, Clears, or Both) and select "Voice Call" for type. Click "Save and Next". Select the numbers you want to call when this alarm triggers. The call list is in order, so if it remains unacknowledged it will continue to the next person. There are two checkboxes near the bottom, check them if you wish to enable their stated behaviour. Hit "Save and Next", and configure the schedule of when you want this notification to be sent. Click "Save and Finish".

Voice notification configuration.
Changes may be made to the notification by clicking on "Edit". You may repeat this process for all notifications. When you are done configuring, click Write under Device Access and wait for the confirmation of success. Then click "Reboot" in the same menu. From the notification screen you can test your notifications by clicking on the Test button after the unit has been written to.
These notifications control a relay when the associated alarm point triggers. This allows you to control power to other units depending upon an alarm state. To set these up, navigate to Provisioning -> Notifications. Choose a notification and click Edit. There we will see a window with Status and Type Options. Select the triggers you want for the Notification (Alarms, Clears, or Both) and select "Relay Group", then click Save and Next. Select the operation you want (latch will close the relay, and momentary will briefly close and open the relay), then select the relays you want to activate. Click Save and Next. Finally, choose the schedule for when you want this notification to be sent. Hit Save and Finish.
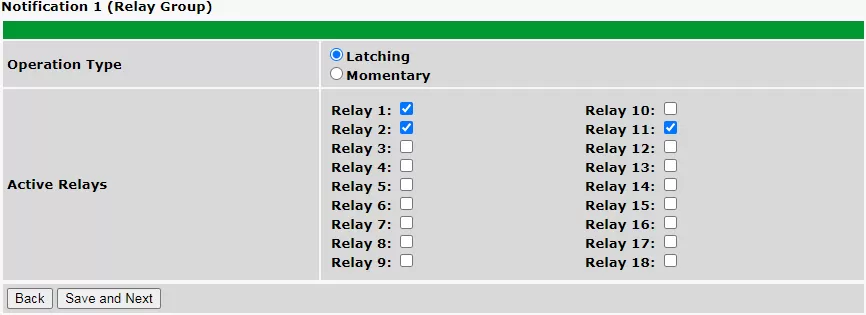
Control relay notification configuration.
Changes may be made to the notification by clicking on "Edit". You may repeat this process for all notifications. When you are done configuring, click Write under Device Access and wait for the confirmation of success. Then click "Reboot" in the same menu. From the notification screen you can test your notifications by clicking on the Test button after the unit has been written to.
Due to our wide and custom product catalog, there are a handful of other types of notifications that aren't covered here. The user manuals for your unit will outline more details about the various types of notifications that you can find on your unit and how to set each of them up. You can find your specific unit's manual here.

Ryan Ridley
Ryan Ridley is an Electronics Test Technician at DPS Telecom. He has worked in tech support, engineering and manufacturing. He brings over 6 years of experience working with DPS hardware and software. At DPS Telecom, Ryan is responsible for performing testing on our products to verify they work ...