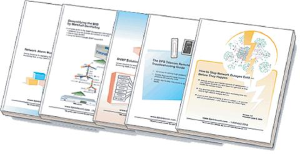
Check out our White Paper Series!
A complete library of helpful advice and survival guides for every aspect of system monitoring and control.
1-800-693-0351
Have a specific question? Ask our team of expert engineers and get a specific answer!
Sign up for the next DPS Factory Training!
Whether you're new to our equipment or you've used it for years, DPS factory training is the best way to get more from your monitoring.
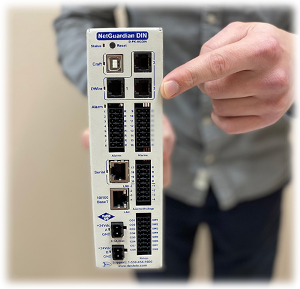
Reserve Your Seat TodayVisit the NetGuardian 216 G3 Product Page
Hello again, I'm Andrew from DPS TV.
Today we're going to be looking at the NetGuardian 216 G3 Web Interface. It's a great way to access your alarm remotes via web browser from any PC on your network. But I'm not just going to tell you about the web interface, I'm going to show it to you. So lets get started.
To access the web interface, I just need to go my address bar and enter the IP address of this NetGuardian on my network.
You'll see that I'm presented with a standard security prompt. I'm going to input my username and password to login.
So here we are on the first screen. This is the base alarm screen. And this is a quick view of the current status of all 16 discrete alarm inputs. You can see I've given them all custom labels to correspond with the various types of equipment at my site. And we give you the current state, either alarm or clear, for all 16 of these points.
If we continue now to the second monitor menu, called system alarms. We'll see a very similar display of internal type alarms. This will tell us if the unit's having trouble sending SNMP traps, connecting to a network, sending notification, syncing up with an NTP time server, and several other things. You can see that all these are in the clear state, so that's a very good thing.
The third monitor menu is controls. And this allows you to operate the two control relays on the NetGuardian. You can see they're both in a released state. But lets assume for a minute that I've had a generator fail, and I want to operate my backup generator.
I simply come over here to commands and click "Opr" for operate. And I'll receive a prompt, "Are you sure you want to latch relay 1?". And I'm sure, so I'll click "OK".
You can see very quickly that the status is updated to "latch", and now the backup generator is running.
If I want to release the backup generator, I'll simply click on "Rls" for release. It'll ask me to confirm that I'm sure I want to do that. And I'll click okay again. That releases the control relay and the status gets updated within a second. It is very fast.
The last monitor screen is analogs. And that lets us view the current status of the 8 analog inputs of this NetGuardian 216 G3.
The first 4 analog inputs can be set for voltage or current mode. In current mode, they accept 4 to 20 milliamps, so they're compatible with all traditional sensors out there. However, they can also operate in voltage mode, from -92 to +92 Volts DC.
The next two are for monitoring power feeds A and B. This particular build option of the NG doesn't come with the second power feed. So you get to chose whether you want that power feed or not. But we can see what the voltage is on power feed A. Currently it's 23.98 almost right on the money for 24 volts. So we got good power coming in.
The last two are internal and external temperature. You can see the internal temp. of this NetGuardian right now is about 76 degrees. The external temperature though, is a temperature probe on a 7-foot lead. And I've got that wired into this particular piece of equipment at the site that I want to monitor more closely. You can see it's running a little hotter at 87, but still nothing to be worried about. So, because all of these analogs are in normal ranges, I don't see any checkmarks in my major under, minor under, minor over, or major over analog thresholds.
Now lets get into the Edit Menus to configure the unit. Start with system, which is the most basic editing screen. And I can name the unit. I can assign it a location. There's a contact phone number in case there's someone inside this unit and wants to contact me and learn more about it, that's my number. The from email address- if the NetGuardian sends email notifications to someone, this will be the email that shows the messages from. These are SNMP set and get community strings for SNMP notifications; user name and password to get into the unit; and the current firmware. This is a very general option screen.
If we continue on from now to Ethernet, we can view or change the IP address of the unit. We can change the subnet mask, gateway, DNS servers- all of our IP settings are here.
Serial ports- here we can adjust the baud rate and some other settings for the serial port, which allow us to telnet into the unit.
Notifications- there's a very cool wizard for this notification system. The NetGuardian 216 g3 supports up to 8 notification devices. And our first device is already configured here. That's our SNMP manager that we're reporting to. We've entered it's IP address, and we're reporting any time, any day of the week, to that SNMP manager.
Now lets take a look at adding another notification option. Lets say I want to send email to someone during particular times when an alarm happens. So I'm going to click on the number here to access the configuration wizard. So I'm going to check the box, labeled "enable notification". And in this case I want to send email, not SNMP. So that's the correct setting. I'll click next. I'll type in the email address of the technician I want to notify. I'll just use myself here, now lets click next.
Now lets assume, I only want to be notified on business hours on weekdays. So here I'm going to uncheck Sunday. I'm going to uncheck Saturday. And then select my times, from 8 am until 5 pm. So that's all set. Then I'll click finish.
And the data's been submitted and written to the flash memory of the NetGuardian. So we're all set. Now we can confirm by looking at line 2. It's type email. It's currently on. And it's Monday through Friday, from 8 am to 5 pm.
Now lets go to the editing base alarms menu. This is where I configure the 16 alarm inputs that I was monitoring earlier. You can see I've given them all custom labels, which I can change if I ever need to. I'm able to reverse the polarity on points if I want to.
And here under notification devices, I can decide which alarms I want to go to my email. "N2" represents notification device 2, which I set up as emailing myself. So if I want to get emails only about certain alarms, this is my chance to do that. I'll click power fail, because I certainly want to see power failures. Main door and side door are probably too frequent during business hours to really merit my attention. So I'm not going to email those to myself. But certainly if a tower light fails, if we're having trouble with the microwave system, if there's a fire, if there's a water leak- these are all things I want notification about. So I'll check those boxes. Then I'll click save. And again, the data has been submitted and written to the flash memory, so it's saved.
Here we have our analogs. Where we can set a description for our various points, as well as major and minor, under and over thresholds. So that we can get alerted if the value crosses a certain level. As an example, if the temperature gets too high or too low, I certainly want to know about it.
Under date and time, I can manually set the current date and time for the unit or I can tell the NetGuardian to sync up with a certain NTP time server and get time information automatically everyday. I can also configure daylight savings time. And, to keep up with the US government's changes, we can adjust what weeks daylight savings time goes into affect.
Under timers, we have a few miscellaneous options related to how often the web interface will refresh. You can see I've got it set to one second, which means that it's updating very frequently. But we could go as fast as 100 milliseconds. So this web interface can be very fast in terms of getting you real-time information.
Finally we have a reboot setting. Which allows us obviously to reboot the unit.
So that's an inside look at the NetGuardian 216 G3. It's fast, easy to use, and it gets you the information you need to do your job better.
For more information about the NetGuardian 216 G3, call 1-800-693-0351. Or visit us on the web at www.dpstele.com/rtus.
To receive a price quote or ROI analysis...
Call 1-800-693-0351