Check out our White Paper Series!
A complete library of helpful advice and survival guides for every aspect of system monitoring and control.
1-800-693-0351
Have a specific question? Ask our team of expert engineers and get a specific answer!
Sign up for the next DPS Factory Training!
Whether you're new to our equipment or you've used it for years, DPS factory training is the best way to get more from your monitoring.
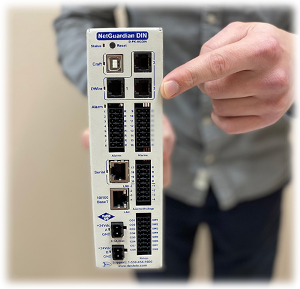
Reserve Your Seat TodayMonitoring your fuel levels is crucial to maintaining uptime and functionality. Without knowledge of the level of fuel remaining in your tank, you will have to send out technicians to your sites to constantly check on them. What's worse, is when a tank runs out of fuel when you need it most - during an outage. Running into a situation where you need to refuel to continue operations, will be costly and cause unnecessary downtime. One of the ways to prevent this is by using a Wireless Propane Sensor. These sensors have a gauge that attaches to the propane sensor and the tank, and sends the information to a NetGuardian, allowing you to recieve a periodic reading of the remaining level in the tank. You can then set up a notification to alert you when the fuel falls below your specified threshold.
Before we dive into how to set one up, it is important to understand how it works. Every hour (depending on the read frequency configuration), the far end of the wireless sensor will wake up and read the fuel level. This is powered by a 3.6V battery. If you make a change to the configuration, for example read frequency, the sensor will not become aware until the next time it wakes up, as the NetGuardian cannot tell the sensor to power up and update.
The wireless sensor needs to wake up on it's own to communicate with the NetGuardian, but this can be forced by pressing and holding down the Sync button on the sensor. Doing so will cause the sensor to update itself.
The first step to setting up this sensor is going to Edit -> Ports on the NetGuardian web interface. If you're unfamiliar with setting up a NetGuardian, check out this article for a guide on initial set up.
If you're using internal wireless radio you'll need to use port 1 for DSCP communication; otherwise use the port on which the extender is connected. Next, you need to set the port type to DSCP and the Baud Rate to 9600. This allows it to communicate correctly with the extender. Leave the other settings as is. In the example below, I have the sensor connected on port 7.

Configuring a port for the propane sensor.
Now navigate to Edit -> DSCP, and put in a value for the Update Frequency. Select "Propane Monitor (Battery)" from the 'Type' dropdown box. Clear the text in the Module Address High and Low fields. Click on Submit to save your settings. Module High and Low should read all zeros now. Now that our settings are configured, reboot the NetGuardian.
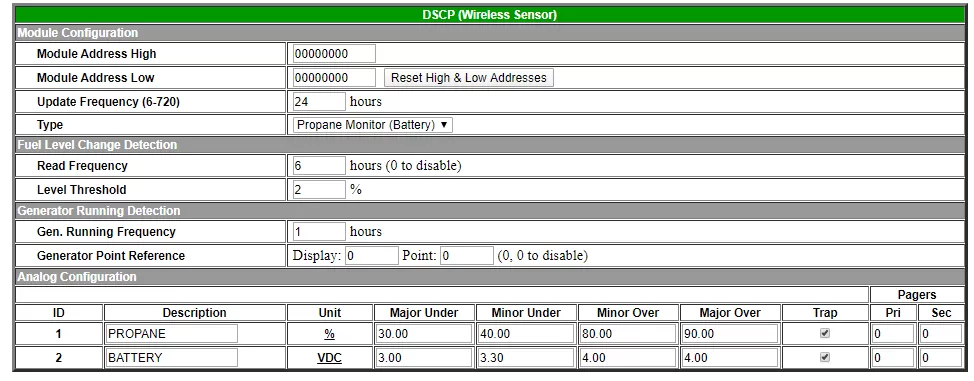
Propane sensor configuration before sync.
When the NetGuardian comes back up, allow it a couple minutes to initialize the wireless radio. Then, go ahead and press the Sync button on the wireless transmitter until the LED lights up. Once the LED becomes lit, the NetGuardian and Wireless Transmitter will synchronize. If you refresh the DSCP page, you will see the module address fields now have values instead of all zeros.
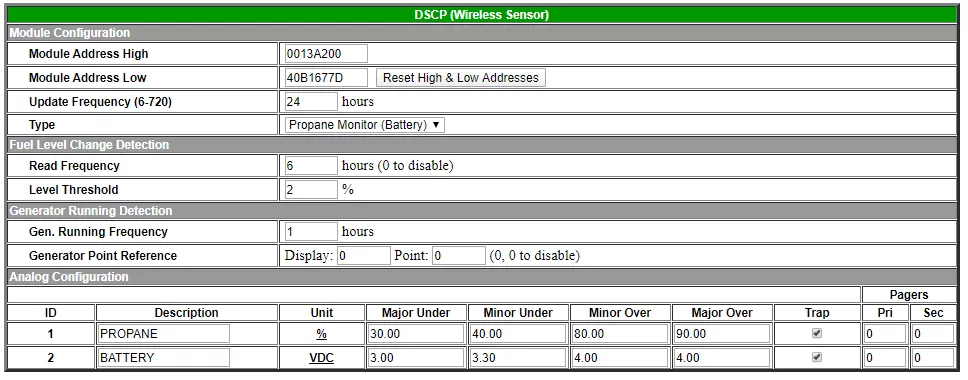
Propane sensor configuration after sync.
The final step now is to configure the analog channels. The image below can serve as a reference for your configuration. Scaling is done automatically by the NetGuardian. Channel 1 is the Propane Sensor in percentage units, ranging from 0-100%. Channel 2 is the battery voltage, the normal voltage level is 3.6v. You should now have a successfully working wireless propane sensor. If you're interested in getting it to show up on the T/Mon, please continue reading.

RTU analog configuration for propane sensor and propane sensor battery.
The first step to set up the sensor to display on a T/Mon is to go to your LAN Based Remotes and set expansion units to 3. This is because the Wireless Propane Sensor uses Expansion 3's displays to send information to the T/Mon.
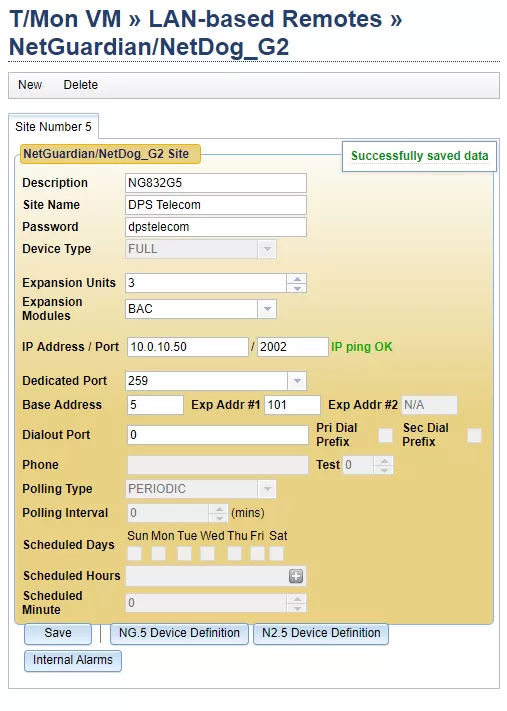
Adding the wireless propane sensor to T/Mon.
After setting your settings similiar to the image above, click save. Then click on "NG.5 Device Definition", and then click Analog Provisioning. Analog 25 and 26 will be the propane level and battery level, respectively. Right click on Analog 25 and select define scale. Input type should be "V", voltage value 1 = "0", voltage value 2 = "50", unit value 1 = "0", unit value 2 = "100", and calc scale should be "0.2". Calc offset should be 0.
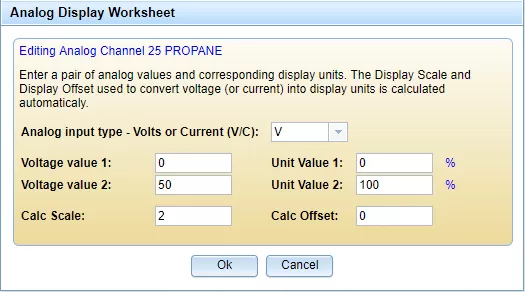
Analog scaling configuration on T/Mon.
These setting will scale the voltage reading of the sensor to a percentage. This doesn't need to be done for the battery because it is already in terms of voltage.
The last step is to setup the thresholds for the sensor. Copy the thresholds from the RTU on which the sensor was installed.
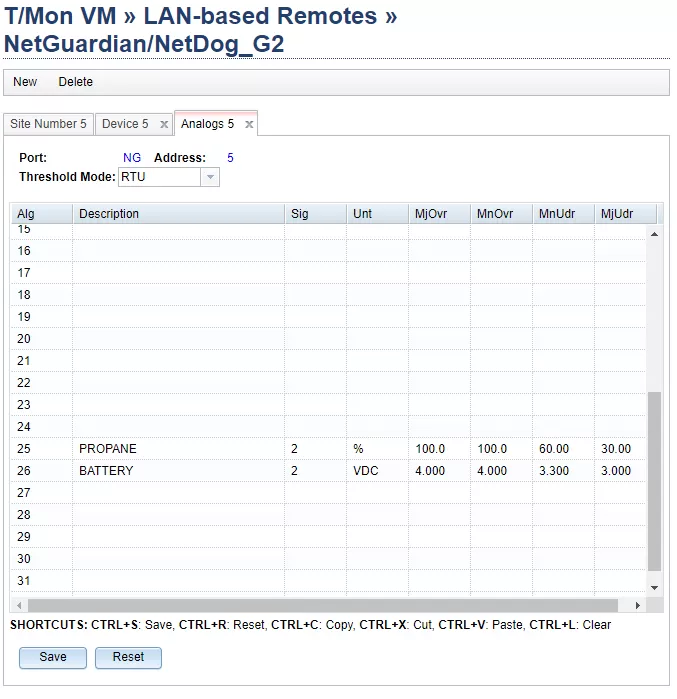
Analog threshold configuration on T/Mon.

Ryan Ridley
Ryan Ridley is an Electronics Test Technician at DPS Telecom. He has worked in tech support, engineering and manufacturing. He brings over 6 years of experience working with DPS hardware and software. At DPS Telecom, Ryan is responsible for performing testing on our products to verify they work ...