Check out our White Paper Series!
A complete library of helpful advice and survival guides for every aspect of system monitoring and control.
1-800-693-0351
Have a specific question? Ask our team of expert engineers and get a specific answer!
Sign up for the next DPS Factory Training!
Whether you're new to our equipment or you've used it for years, DPS factory training is the best way to get more from your monitoring.
Reserve Your Seat TodayWhat's more convenient than getting alarm notifications directly in your e-mail? Acknowledging the alarm just by clicking Reply. T/MonXM's e-mail notifications are a great way of sending alarm information directly to the people who need it - and you can also extend that functionality by configuring T/MonXM to accept replies from e-mail recipients.
Step One: Configuring T/MonXM to send E-Mail NotificationIf you haven't already configured your T/MonXM system to send e-mail notifications, you should start at the beginning. To send and receive e-mail, your T/MonXM system must be able to connect to a mail server via LAN. The mail server should support SMTP (for sending outgoing mail) and POP3 (for receiving incoming mail). T/MonXM needs an e-mail account, a user name, and a password on your mail server. Contact your network administrator for assistance in setting up an account for T/MonXM.
Once the e-mail account has been created, T/MonXM needs to be configured to access the account. You'll need to set up two virtual port LAN jobs to represent T/MonXM's access to the SMTP and POP3 servers. For full instructions on configuring T/MonXM for e-mail access, see "Alarm Notification via E-Mail" in Section Seven of the T/MonXM User Manual.
Step Two: Defining your E-Mail RecipientsYour next step is to define a list of e-mail recipients. As far as T/MonXM is concerned, sending an e-mail is exactly like paging someone. Consequently, e-mail recipients are defined as pager carriers.
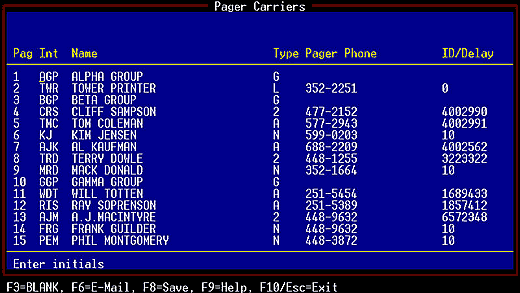
To access the Pager Carrier list, choose Files > Pager > Pager Carriers. The screen will show a list of the people already defined as pager carriers, as shown in the picture above. If you need to add more people to the list, find a blank entry and enter their initials and names. If you only want to send e-mail to your recipients, you don't need to enter a pager number for them.
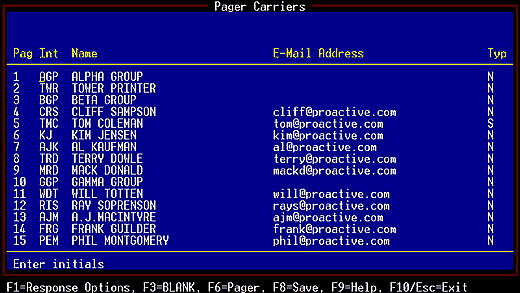
Now press F6 to access the Pager Carriers e-mail list. Enter an e-mail address for each person you want to send e-mail to.
Step 3: Define Response Options for E-Mail RecipientsThis is a crucial step. In order for e-mail recipients to be able to acknowledge alarms, you must specifically grant them response privileges. This increases the security of e-mail notifications and lets you define exactly what kinds of acknowledgments your personnel can send.
Response options are defined individually for each e-mail recipient. Select an e-mail recipient and press F1. This accesses the Response Options screen, which looks like this:
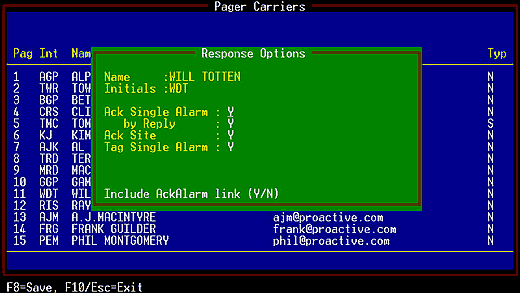
There are four response options for each e-mail recipient. You can select any or all options for each e-mail recipient. Alternatively, if the e-mail recipient should have no privileges to acknowledge alarms, you can turn all the response options off.
Here's what the four response options mean:
Ack Single Alarm: The recipient can acknowledge single alarms. An HTML link will be included in e-mails to this recipient, and the recipient can acknowledge the alarm by clicking the link.
by Reply: The recipient can acknowledge alarms simply by sending a reply e-mail to T/MonXM.
Ack Site: The recipient can acknowledge all the alarms at the site where the alarm occurred by clicking a link in the e-mail.
Tag Single Alarm: The recipient can tag alarms by clicking a link. (Tagging alarms silences them until they are untagged. For details, see "Tag Alarms" in Section Nine of the T/MonXM User Manual.)
Step 4: Format the E-Mail Alarm Notification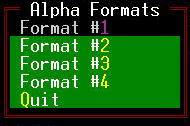
This another crucial step. T/MonXM uses predefined formats for e-mail and alphanumeric pager alarm notifications. Before T/MonXM can send e-mail notifications, you must define the message format it will use.
To format a message, you must access the Edit Alpha Pager Format screen. Choose File > Pager > Alphanumeric Formats. This will open the Alpha Formats submenu, where you can select one of four message formats to edit.
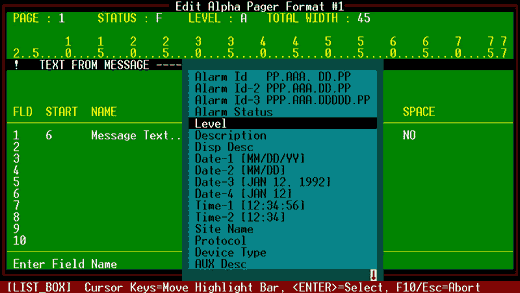
The pager format is essentially a list of placeholder fields that T/MonXM will fill with appropriate information for each alarm, such as Level, Description, Site Name, etc. The information that T/MonXM will place in these fields is specific to each individual alarm and cannot be edited here.
You can select up to 14 fields for each message format. To edit the format, select a field and press the Tab key to open a list box of possible fields. You can fill the message format with a little information or a lot, depending on how much detail you want the e-mail recipient to see. You can define different message formats for personnel with different responsibilities and security clearances.
To create a basic e-mail notification that includes sufficient information about the alarm, we suggest that you select Level, Description, Site, Date, and Time.
For each field you can also select the width in characters that the field will have in the notification message. If the information for the field is longer than the selected width, the right side of the message will be truncated. This feature is really designed for the small screen of a pager. For e-mail notifications, you can set the width of each field to the maximum, which is 153 characters. But keep in mind that you can use the same message format to send alarms to both pager carriers and e-mail recipients.
If you'd like to see what the resulting message will look like, press F6 (the Sim, or Simulate, command). This will cycle through all combinations of level and status and show you a preview of the message for each combination.
For full instructions on editing message formats, see "Alphanumeric Pager Formats" in Section Six of the T/MonXM User Manual.
Step 5: Assign Each E-Mail Recipient to a Pager Operator, Schedule, and ProfileYour next steps are to assign each of your e-mail recipients to a pager operator, schedule, and profile. These are successive steps that define which alarms are sent to the e-mail recipients. For full instructions on assigning specific alarms to e-mail recipients and pager carriers, see "Pager" in Section Six of the T/MonXM User Manual.
Step 6: Acknowledging E-Mail Alarm NotificationsIf an alarm happens, the e-mail recipient will receive an e-mail that looks like this:
This message is an alarm notification from NOC.
This message was generated on: Aug 5,2003 16:52.
CRIT GEN FAIL PBX SITE 1 Aug 5, 2003 16:52
* * * * * * * * * * * * * * * * * * * * * * * * * * * * * * * *
You can send an e-mail message to the alarm system to affect
this alarm. Clicking one of the links below will cause a correctly
formatted message to be created. All you need to do is send it.
Click this link to create a message that will acknowledge the alarm:
mailto: noc5@proactive.com?subject=AckAlarm=
Click this link to create a message that will tag the alarm:
mailto: noc5@proactive.com subject=TagAlarm=
Click this link to create a message that will acknowledge all alarms
at the site that this alarm came from:
mailto: noc5@proactive.com?subject=AckSite=
* * * * * * * * * * * * * * * * * * * * * * * * * * * * * * * *
For technical support on the alarm system call DPS Telecom at 559-454-1600
or e-mail us at support@dpstele.com. For more information about
DPS Telecom and our products visit our web site at http://www.dpstele.com
The specific links that the recipient will see depends on the response options defined for him or her. For each action, the recipient only has to click the link.